Salesforce Login Discovery Page
Overview
This guide explains how to vary the authentication behaviour to Salesforce depending on the domain found in the username, by taking advantage of Apex handlers. By default, Salesforce does not have a built-in method to adapt the authentication requirement for different users. This complicates integration such as with Chatter, where external users may require a different form of authentication than the other Salesforce users.
In this guide, we configure Salesforce in a way that only specific users will use strong multi-factor authentication with SafeNet Trusted Access (“STA”), a leading-class cybersecurity platform to control in real-time access patterns.
Internal users will login to Salesforce using STA as a 3rd party SAML SSO IdP, based on a specific list of domains
domainFiltersthat are compared against theSalesforce username.For all other users, authentication is based on the basic
Salesforce
password
.
Instructions
Salesforce Configuration
Note
The steps provided are using the Salesforce Lightning experience. While the steps may slightly vary in the Classic experience, the overall procedure remains the same.
From your Salesforce admin console, search or navigate to Apex Classes and click New.

Enable this custom login discovery handler under .
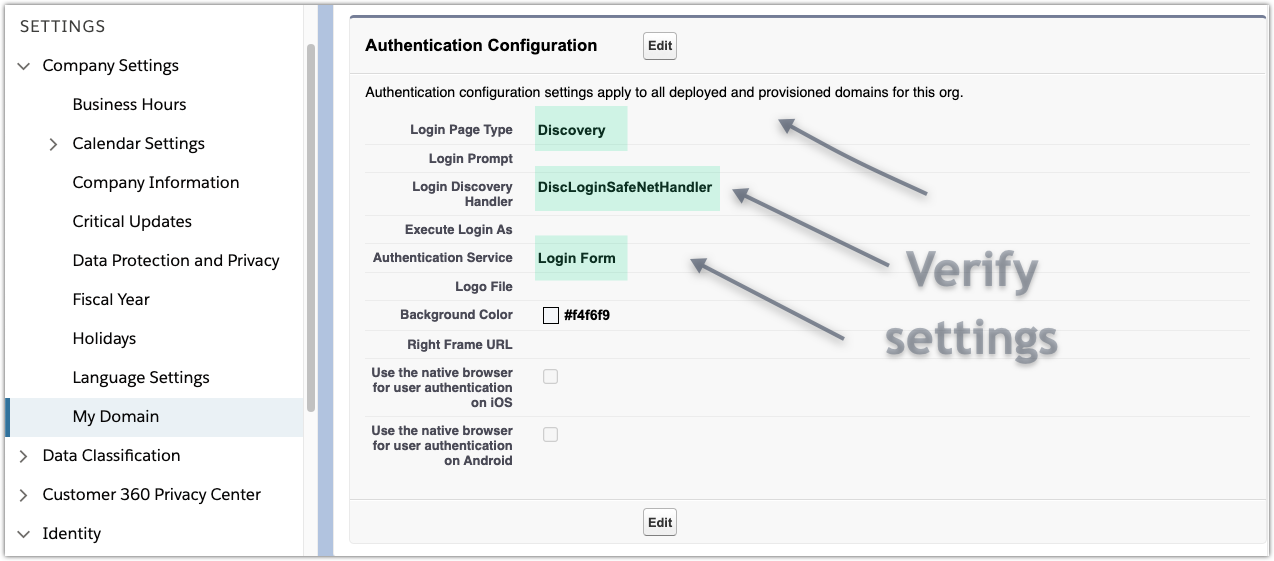
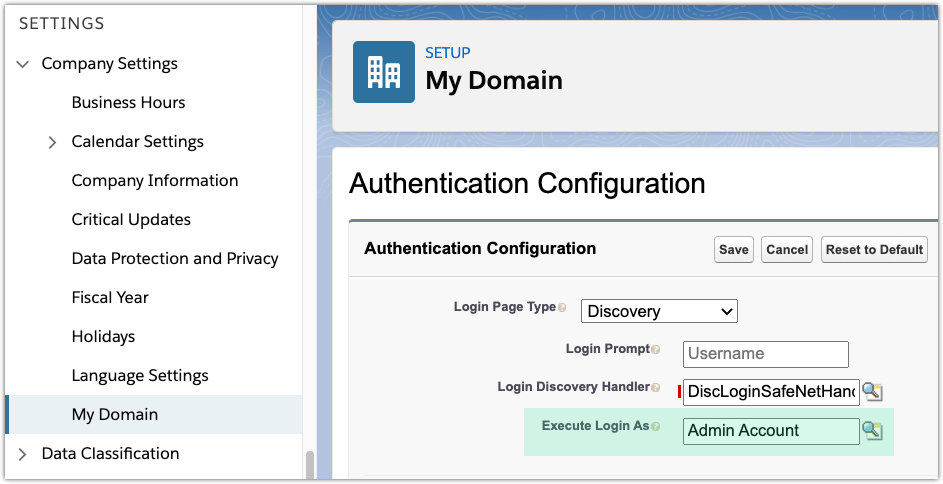
Under Authentication Configuration select the Discovery Login Page Type.
For Login Discovery Handler select the
DiscLoginSafeNetHandlerhandler from the list of Apex classes.Also confirm that
Login Formis checked as the Authentication Service.
Click on Save.
Verify your settings.
(Optional) Enable the Prevent login from https://login.salesforce.com policy under . Complete this step after validating the solution if this policy is not already enabled.
Apex Handler
Note
The following handler which implements a custom Login Discovery page is in Salesforce preview.
Parameters
The following parameters will need to be modified in the apex code to suit your environment:
domainFilterscomma-separated list of domain names to be parsed from the Salesforce username for redirection to the STA IDP
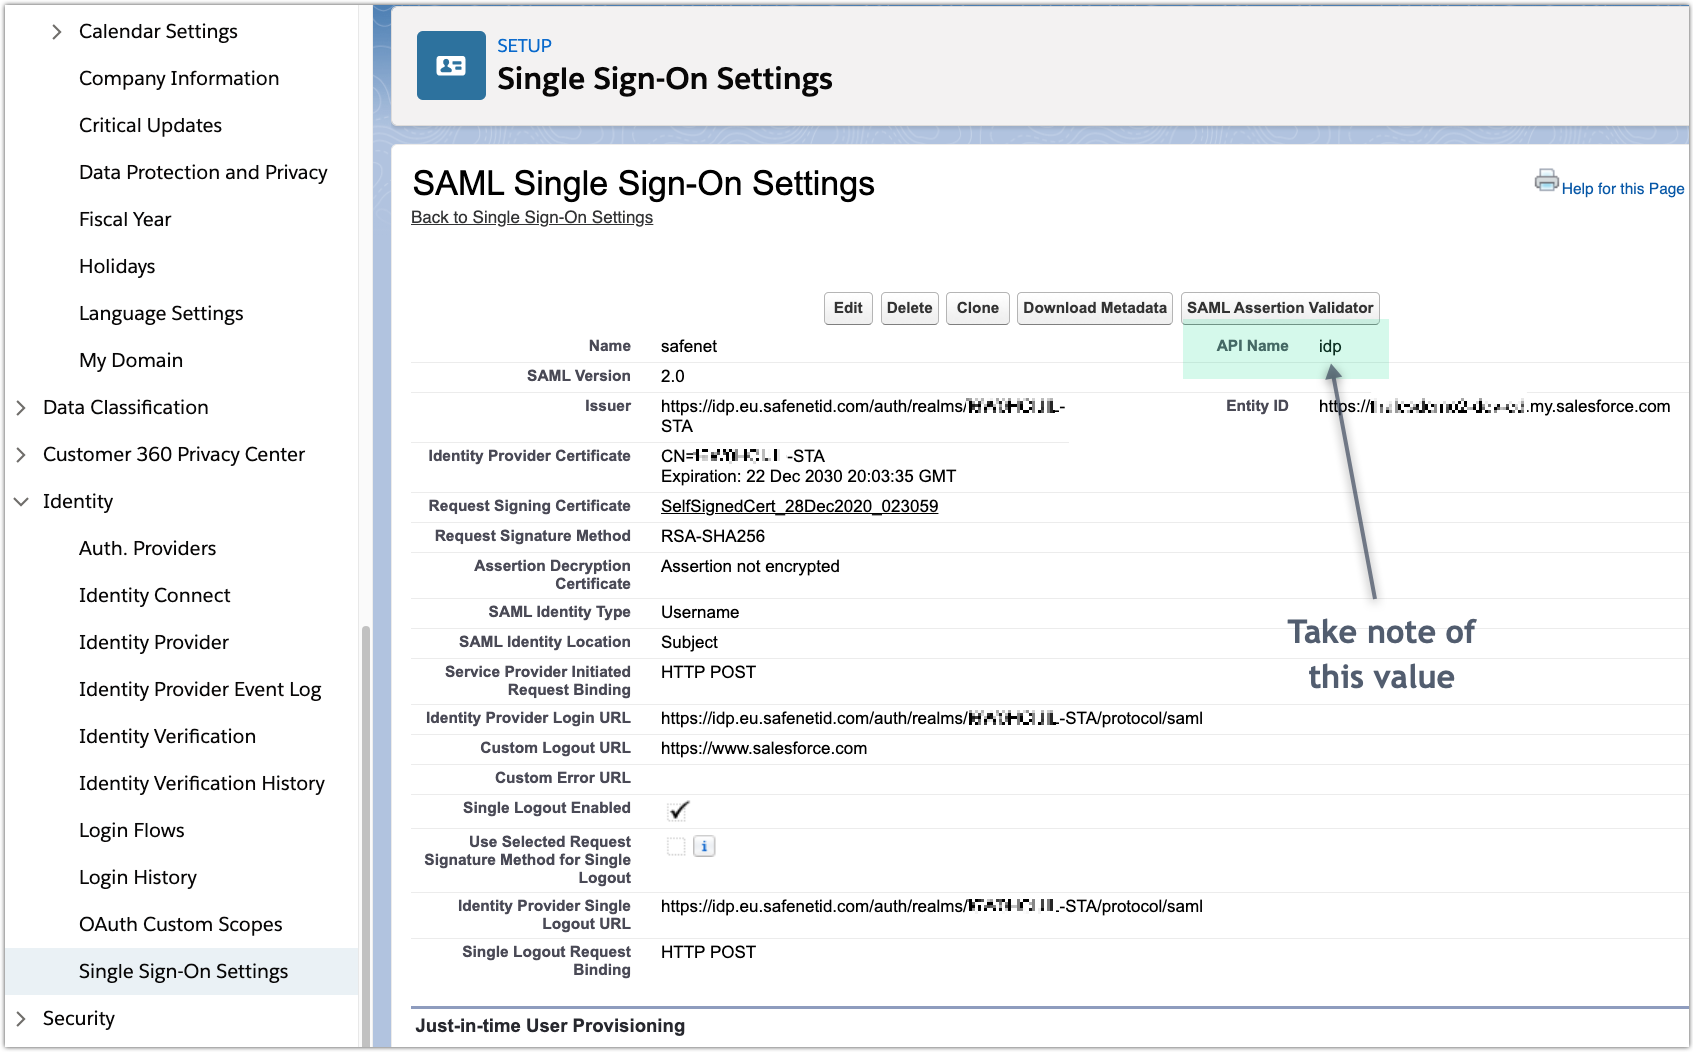
idpNameAPI name of the STA IDP in Salesforce
Tip
The API name can be found under by viewing the IDP config details ( ➝ click on the STA IDP name).
Code 1
Refer to the definitions in the previous section to set the yellow highlighted parameters for your own environment.
1 2 3 4 5 6 7 8 9 10 11 12 13 14 15 16 17 18 19 20 21 22 23 24 25 26 27 28 29 30 31 32 33 34 35 36 37 38 39 40 41 42 43 44 45 46 47 48 49 50 51 52 | // This Salesforce Login Discovery class enables adaptive authentication logic from the domain
// found in the Salesforce username (that is after an '@' symbol).
// e.g. domain.com if incoming username is xyz@domain.com
// Use Auth.DiscoveryCustomErrorException to throw custom errors which will be shown on login page.
global class DiscLoginSafeNetHandler implements Auth.MyDomainLoginDiscoveryHandler {
global PageReference login(String identifier, String startUrl, Map<String, String> requestAttributes)
{
if (identifier != null) {
// Search for user by username
List<User> users = [SELECT Id, Username FROM User WHERE Username = :identifier AND IsActive = TRUE];
if (!users.isEmpty() && users.size() == 1) {
return discoveryResult(users[0], startUrl, requestAttributes);
} else {
throw new Auth.LoginDiscoveryException('No unique user found. User count=' + users.size());
}
}
throw new Auth.LoginDiscoveryException('Invalid Identifier');
}
private PageReference getSsoRedirect(User user, String startUrl, Map<String, String> requestAttributes)
{
// API name of the SAML IDP
String idpName = 'idp';
// Look up if the user should log in with IDP and return the URL to initialize SSO.
SamlSsoConfig SSO = [select Id from SamlSsoConfig where DeveloperName=:idpName limit 1];
// To get the URL for a My Domain subdomain, you can pass null in the communityURL parameter.
String ssoUrl = Auth.AuthConfiguration.getSamlSsoUrl(null, startUrl, SSO.Id);
return new PageReference(ssoUrl);
}
private PageReference discoveryResult(User user, String startUrl, Map<String, String> requestAttributes)
{
String domain = user.Username.split('@').get(1);
// Modify the list of domains between the brackets. For single domain, do not include a comma separator.
List<String> domainFilters = new List<String>{'thalesdemo.ml', 'thalesgroup.com'};
PageReference ssoRedirect = null;
try { ssoRedirect = getSsoRedirect(user, startUrl, requestAttributes); }
catch(Exception e) { ssoRedirect = null; }
if(ssoRedirect != null && domainFilters.contains(domain)) {
return ssoRedirect;
} else {
return Auth.SessionManagement.finishLoginDiscovery(Auth.LoginDiscoveryMethod.password, user.Id);
}
}
}
|
Validating the Solution
With the above domainFilters, when the domain in the username is either @thalesdemo.ml
or @thalesgroup.com, users will be redirected to the STA IDP for authentication
to subsequently access Salesforce.
Other users will login with the regular Salesforce password. This is achieved by changing the login experience on Salesforce. That is, instead of entering both username and password on the first login window, the form now only asks for the username.
admin@thalesdemo.ml↳ Result: redirected to STA based on domain filter (long video)
sales@thalesgroup.com↳ Result: redirected to STA based on domain filter (short video)
test-user@mailinator.com↳ Result: prompted for Salesforce password
Troubleshooting
You can debug apex classes with the System.Debug() statement. In order to
capture those logs, you first need to:
Return to Authentication Configuration in and click Edit.
For Execute Login As select an administrator account and Save the settings.
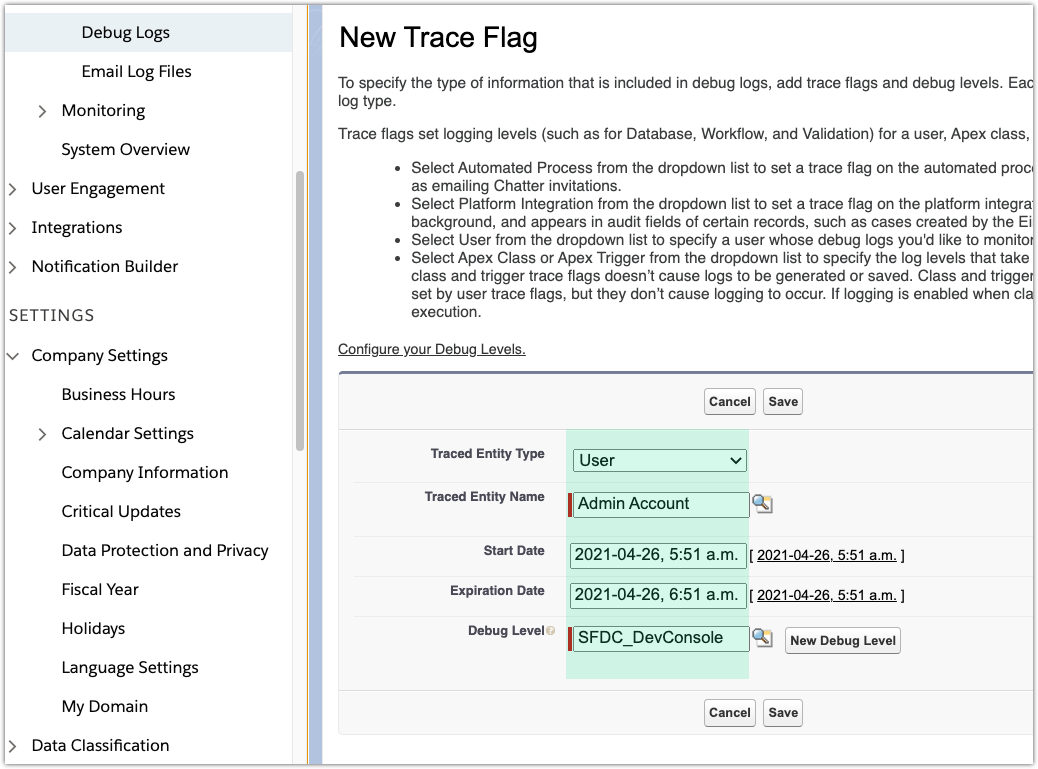
Navigate to ‣ Debug Logs and click Edit.

Configure the trace:
Property
Value
Trace Entity Type
Select User
Traced Entity Name
Name of the admin account from the previous step
Start Date
Start time for the trace logs
Expiration Date
Stop time for the trace logs
Debug Level
Set or create a debug level (or higher) for Apex Code category
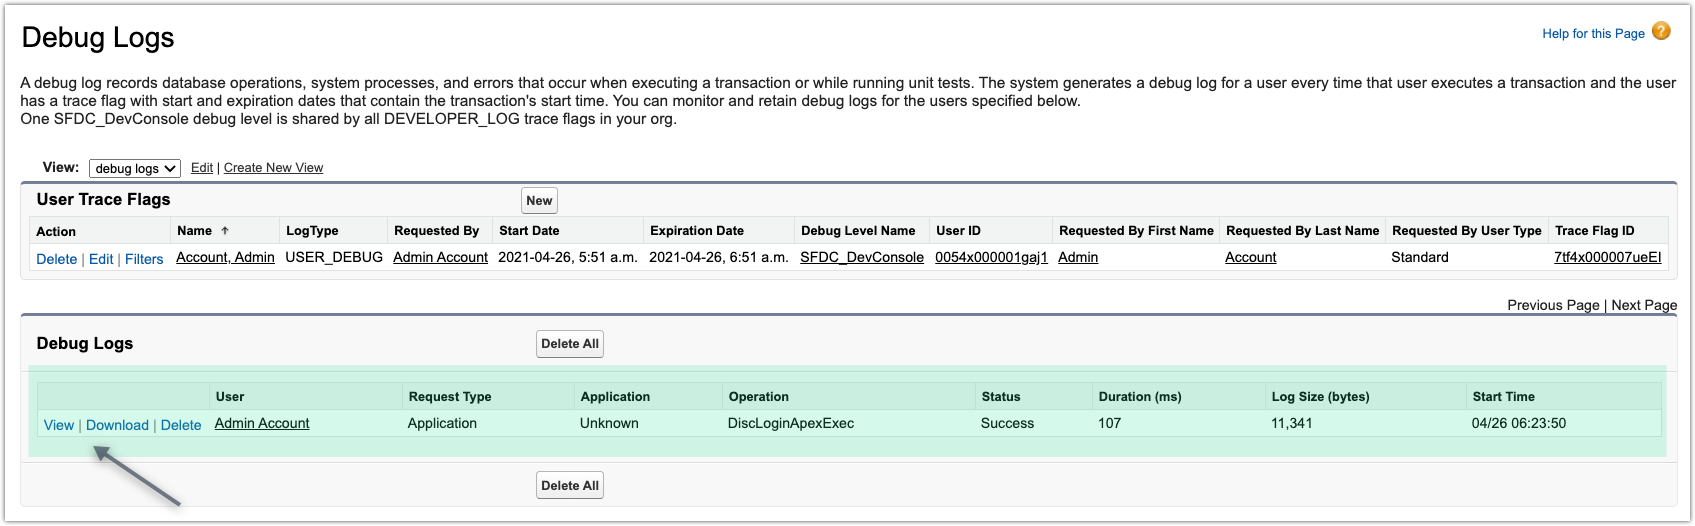
Modify the Apex Class Handler to add wherever desired
System.Debug()statements.Login to Salesforce (using the Discovery page) to generate logs.
Go back to ‣ Debug Logs to view or download the logs.
Footnotes
Contact
If you have any remarks about this guide, please don’t hesitate to contact us directly !